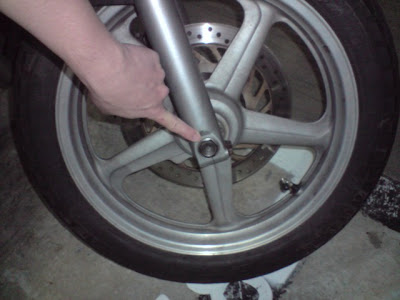
First remove the axle nut.
It requires a 24mm wrench or socket.
To make life easier for this part, it's better to have the bike on the sidestand and the wheel resting firmly on the ground. This makes it easier to remove the axle hardware without the bike rocking all over.
Next remove these two axle pinch screws on the right side. You actually only need to loosen them not remove them, if you're just going to remove the wheel. But since I'm going to be disassembling the forks, I removed the screws completely for cleaning.
Space is tight for a wrench, so I used a socket and extension. Since this is the first time I'm undoing these screws, I wasn't sure how tight it was going to be, so I used an old 1/2" drive Stanley breaker bar with a 1/2" to 3/8" adapter, and the extension and socket at the end of that. If I'm not wrong, the heads on these are 10mm.
Here're the axle pinch bolts on the left side.
Remove both of them.
Next remove the speedometer cable from the speedo assembly. It's a #2 Phillips screw.
Now the axle is ready to come out. This is where you park the bike on a mainstand and use some sort of jack to support the front end. When I did this, I only had one jack, so I supported the front of the bike by jacking up on the exhaust headers. This will work in an emergency but I wouldn't recommend it. Get jackstands or get two jacks, and try to jack the bike up on the frame rails, or if your bike has them, the engine guards.
I actually took this picture to remember the routing of the brake cable, but you can see the jack supporting the front of the bike. I wedged the handle of my mallet in between to protect the pipes. Don't do what I did.
There are two ways you can remove the axle. If the axle is not too tight in there, you can just insert a screwdriver through this hole here, and with a left-right twisting action, pull it out.
Stick a thin screwdriver shank through the hole like this. I just grab and try to twist the axle out. Remember, if you support the weight of the wheel while you're pulling out the axle it's going to come out easier. That way, the wheel is not pressing down on the axle because of it's weight.
If the axle is really tight in there for some reason (probably from not being cleaned and greased the last time it was removed), get a deep socket with an external diameter close to the diameter of the axle, put it on the axle on the right side of the wheel and give that socket a smart whack with your hammer. Be careful not to let the socket get too deep in there. If you do, just tap the axle on the left back in a little till you can grab your socket.
Once the axle is out, you can remove the wheel. There's a spacer on the right side and the speedo housing on the left. Try to catch them as you're removing the wheel before they hit the floor if you can.
Here's a picture of the components removed. The four screws on top are the axle pinch screws. The round piece on the left is the speedometer housing. I threaded the screw for the speedometer cable back into the housing so I don't get it mixed up. This is a good technique to remember where the screws come from. The long piece is the axle, and I inserted the spacer and axle nut back onto the axle, you can see them on the right end of the axle. The two small screws on the bottom left are the front fender screws I believe.
Next I stick a big flat-head screwdriver between the pads and pry the pads back to push in the caliper pistons. Then I remove the caliper screws to remove the brake calipers. Use some rope to tie them to the handlebars. Don't let them hang down on their own weight because it'll damage the brake hose.
Next undo the four fender screws (two on each side) and remove the fender by sliding it down along the fork tubes. Be careful not to scratch them. You can see the brake caliper tied with some string here.
Now the forks are ready to come off. Undo the top yoke pinch bolts, one on each side. You don't need to remove these screws, you just loosen them sufficiently till they're no longer clamping the forks in the top yoke.
You need to use a 12mm combination wrench here because there's not enough clearance for a ratchet to fit in there. If you have a ratcheting wrench, now's the time to use them. I didn't, so I just used my combination wrench.
Next you want to loosen the bottom tree pinch screws. Here's the right one.
The one on the left:
Another view from the side.
Continued on part two...
If you haven't already, please follow this blog.
Use your tools, and happy wrenching!


this is great! WHere is Part 2?
ReplyDeleteHey,
ReplyDeletethis is a fantastic post (including part 2 and 3). I am about to rebuild the fork on a friend's '99 Night Hawk and I feel well-prepared.
Also, I am a motorcycle blogger myself and this is much better than any tuning/repair post I've ever done (freeranging.net) - I tip my hat to you.
Thanks and stay safe,
Anna
Hi Anna,
ReplyDeleteThanks for dropping by! Thanks for the kind words, they mean a lot.
But as you can see I'm not much of a blogger. :)