Pry up the plastic cover with your fingers, and you should be able to see the cap below.
I know, I need a better camera.

I used this 17mm hex socket to loosen the caps. It's a big one!


Once you start to see the black rubber O-ring coming out of the tubes, go slow, because the cap is under very strong spring pressure and will shoot out and hit an eye if you're not careful. I use a piece of cloth and wrap it round the top of the fork cap, then I grab the fork tube with my bottom three fingers, and wrap my thumb and index finger around the hex bit on top of the fork cap, to prevent the cap from flying off.
I would strongly suggest wearing safety glasses and clearing the immediate area around you when you pop the cap off. That cap is under very strong spring pressure.


Next comes the spacer.You can actually modify the spring preload of your bike by cutting or lengthening the spacer. A longer spacer means more preload. A shorter spacer means less preload.


If you did not loosen this screw before you removed the wheel, you'll need to put the spring, spring seat and spacer back in, and screw on the fork caps. This will prevent the damper rod (which the screw is attached to) from spinning freely.

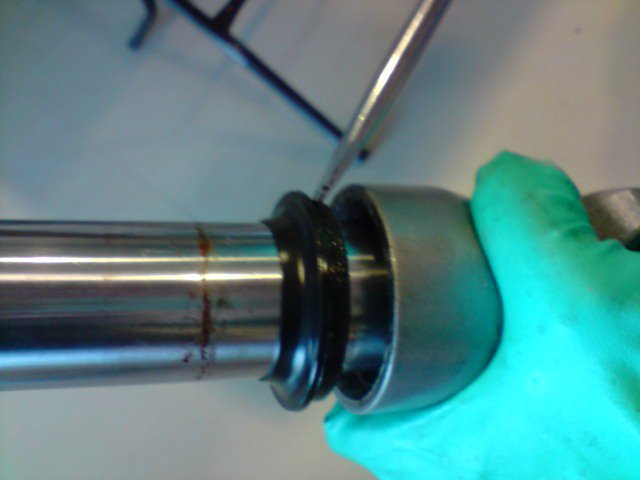
Next use a screwdriver or some kind of pick or scriber to pry the dust seals off.


This was what it looked like under the dust seal. Lots of grime and corrosion.


Out comes the stopper ring. It's badly corroded. I'm starting to suspect that the seals haven't been replaced in a long time.

The black ring is the oil seal. Looks like it hasn't been changed in a long time. The copper looking thing is the slider bushing.The grey piece on the right is the fork tube bushing. It's coated with teflon I think.

A look at the bore after the fork tubes were removed. Needs a good and thorough cleaning.


After you pull out the fork tube, you should find the oil lock piece stuck on the end of the damper rod, as shown in the picture below. Sometimes it doesn't come out with the damper rod if someone has used an impact wrench to tighten the drain screw on the bottom of the fork (which should never be done by the way). When that happens, the oil lock piece will be at the bottom of the lower fork tube.
You don't have to remove it if you don't want to, but if you want to, pour some solvent in there (mineral spirit, paint thinner, diesel, kerosene, whichever you prefer), give it a good shake, and use something long to agitate it. It should fall out once the fork oil is washed off.

Turn the fork tube upside down and the damper tube should fall out. Be careful, the edges of the drilled holes on the damper tube are really sharp. It cut a deep gash on my finger when I was cleaning it. You can see the damper spring coiled around the damper tube. You can just slide the spring off for cleaning.

A close up shot of the damper tube and damper spring. See the hole on the tube? It has scary sharp edges. Pardon the mess. :)

If you haven't already, please follow this blog.
Part three is coming soon, so watch out for it. Use your tools, and happy wrenching!
Great write up! I was wondering, did you replace that stopper ring? Is it necessary? If so, where would you recommend I find one?
ReplyDeleteHi yes I did replace mine because it was so badly corroded. I bought it from my local Honda parts distributor.
DeleteCheck with your local Honda parts distributor.